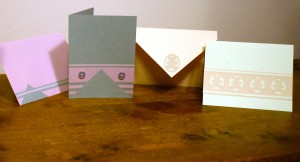
In today’s economy, every penny counts. Making classy, creative, expensive-looking greeting cards, invitations, place cards, bookmarks, and envelopes to match, will fit into any budget. All you really need are 3 things to get started, and chances are good that you already have them: paper, glue and scissors.
 You can actually create your own cards and envelopes with any type of paper you choose, but if you just want to dive right into decoration, you may want to start out with ready made blank cards and envelopes. Blank cards are a perfect way to get started making professional looking cards even if you are just beginning. They truly leave you little room for error!
So, once you’ve either purchased or made your blank cards, it’s time for the really fun part. A card means so much more when you create something with your own hands than if you were to go out and purchase a stock item from a store. The effort and beauty will most certainly be appreciated whether it’s a birthday card for your mom, a place card at a retirement dinner or a simple hand-made bookmark for a friend.
Choose your supplies
Before you begin, you’ll want to make a few choices. Are you making a card, place marker, bookmark, invitation, or announcement? What size is appropriate; will it be a large birthday card or small gift card to attach to a gift bag?
Start Simple
What will your color palette be? Pastels, black/white, earth tones? My suggestion, is to start simple. Choose one or two colors in addition to the color of the card and envelope. Choose colors that will contrast and compliment each other and that will lend themselves to the person or event you are creating the item for.
Choose simple shapes. Use the color and the paper to create the design. When choosing your paper, look for different textures and weights to give your item a more three dimensional look and feel. Pay attention to the negative shapes that show through the shapes you cut out. Experiment by cutting out simple shapes and arranging them in different ways on your card. Don’t be afraid of layering shapes or making your design asymmetrical. There is no “right” design; just a single paper shape placed on the front of a card in a contrasting color can be striking.
Add a touch of unique detail. If you just can’t help yourself and need to use something other than paper on your creation, try a button or two; maybe a ribbon, a piece of fabric or a small dried flower. And remember that the paper shapes don’t have to be completely glued down; curl up the corners of a simple paper shape or leave a flap loose and have something else show underneath. The possibilities are endless – ah, but we were keeping it simple for now, weren’t we?
Finally, bring your envelope into the design. A simple splash of color or a shape similar to one on the card is a simple way to finish off the project and create a matching set.
Oh, and don’t forget that this wonderfully personal, unique and expensive looking creation, envelope and all, cost you less than a dollar to make.
