Category Archives: Card Making

Greeting cards at the Post Office? How can you cash in?

That’s right – at the post office! The financially troubled U.S. Postal Service has a “get well” plan that includes selling Hallmark greeting cards at their local branches. Check out the Washington Post article for full details.

PostOffice

Marketing Your Artwork

So how can greeting card artists cash in on this plan? While you can’t compete with Hallmark at the USPS, check out your local mail franchises, such as Postal Annex, Mail ‘n More, PostNet, etc. Our community also has several postal sub-stations (franchises) at various locations, such as the Sears Catalog Store. Franchise owners are often willing to display greeting cards. You can check on the franchises in your community on franchisegator, franchise-guide, or at postalconnections.

How you display your artwork and cards is very important. While you might not be ready for a large spin-rack, the cost-conscious artist can start out by using our individual acrylic stands. They come in multiple sizes, and are reasonably priced.  Check out our clear acrylic small card/print stand, our large card/print stand, and our print/calendar holder. Each stand will hold multiple cards and envelopes.

Cardmaking Made Easy

A friend recently asked me to try out the Ultimate Crafter’s Companion (UCC), the latest in cardmaking accessories from Crafter’s Companion, but frankly I was skeptical. What could this “little pink suitcase” do for me that I couldn’t accomplish with a ruler, paper cutter and scissors? While I usually jump at the chance to acquire new crafting tools, I wasn’t convinced that this was really anything different from what I already had. Boy, was I wrong. Actually, I was blown away.

Easy Folding
My first discovery was a simple but important one—the ease of folding cardstock. Anyone who has tried making their own cards knows the frustration of folding the cardstock, only to discover it is slightly uneven. Refolding looks awful. I was amazed to discover that the Ultimate Crafter’s Companion  provided a way to fold any size card in half in seconds, with perfect, professional results every time. No measuring, no guessing, and no mistakes. I’m a fan of saving time, so this was a good introduction to this new product. And it only got better.

Envelopes
After watching the instructional DVD I couldn’t wait to get started making the unique cards, envelopes and boxes I saw demonstrated. They even have what they call an “envelobox” for extra thick cards. I love the idea of being able to make a perfectly sized envelope for any size card, add a contrasting liner and even emboss the flap. I had never been able to master the art of making envelopes, but it will never be a problem again. The creative possibilities are endless.

Make your own gift boxes
Once I tried boxes I couldn’t stop making beautiful gift boxes. Just in time for the holidays! The lids fit perfectly – no measuring on my part. This system is fabulous. Just like the envelopes, the UCC folks have done all the thinking and measuring for you.

Ultimate Crafter's Companion

Ultimate Crafter’s Companion

Speaking of holidays, this winter I’ll be sending out some stunning cards—without the stunningly high price tag. Join me in tackling some fun holiday projects.

Georgia Lange, Fall 2009 Featured Artist

georgia-langeAlthough collage is not my primary medium as an artist, it is one of my favorites to work in. I find the process of collage to be limitless in its rewards. When I have been painting or drawing for an extended period of time, collage can be a breath of fresh air. The manipulation of text, paper, and found imagery has the ability to generate ideas that would have otherwise remained undiscovered.

I tend to approach collage as a puzzle, and the puzzle always begins with a pencil and a page of old text. I usually use vintage books that I find in alleys, dumpsters, or antique stores (I think I feel less guilty about defiling literature that has been discarded or damaged. I also prefer the look of aged paper for aesthetic purposes). I scan the text for words that grab my attention, and slowly circle those fragments to weave out a stream of consciousness that takes to form of a poem. I then paste small scraps of paper over the unwanted areas of text exposing only the manipulated prose. This “found poetry” is the backbone of the illustrated aspects of the collage.

hard knocks
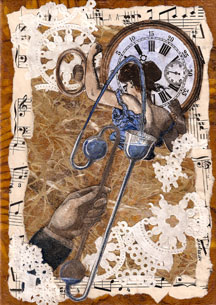
When working with a collage piece, I usually choose either a piece of panel (wood of canvas) or a shadow box (using an old dresser drawer is a popular technique for making shadow boxes). When working on panels, my collages are usually double sided with one side showing the text and the other showing images. All of the images that I use in my collages come from books of clip art and copyright-free vintage illustrations.

I also use paper lace, handmade colored papers, and sheet music for backgrounds and textures in my collages. When all the pieces of the puzzle have come together, I sometimes finish it off with washes of acrylic adding touches of color to specific areas of the imagery. When complete, I seal the piece with acrylic matte medium.

lively-prelude
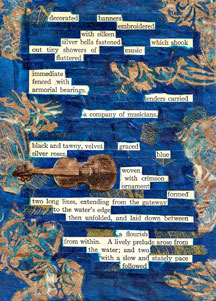
Making a collage is a lot like an act of brainstorming. When an artist feels that his or her creative well has run dry, collage can be a source of newly generated inspiration. To keep our creative juices flowing, it is important for us always to try new things. You never know what you might discover.

http://georgialange.com

Perfect Folds Give Greeting Cards Professional Finish

On the surface, folding paper appears to be a pretty straightforward subject, but in fact, for artists and crafters who are creating their own note cards, greeting cards and other stationery products, understanding each paper’s specific characteristics can make the difference between an average card and an extraordinary one.

Creating the perfect fold doesn’t really require an understanding of the paper manufacturing process, but it sure does help to explain why folds sometimes go terribly wrong.

In the manufacturing process, paper begins as a mushy soup, which is forced through a fine screen with enough pressure to squeeze the liquid out of the mix. As the fibers of the paper mixture blend and settle into position, they align in a single direction establishing the ‘grain’ of the paper. Chapter 6 in Getting it Printed, by Mark Beach, Steve Shepro, and Ken Russon, is titled ‘Paper and Ink,’ and provides an encyclopedic review of papers’ characteristics and the paper-making process.

Since greeting cards are typically printed on a cover weight paper or a card stock, it is necessary to score the card before folding in order to prevent the paper from cracking. Without scoring, the greeting card may have a bumpy, unsightly fold, even more so if folded against the grain, in which case cracking is likely. The pressure of scoring crushes the paper fibers along the precise path of the fold on the greeting card.

You may also hear scoring referred to as ‘creasing.’ While the tools and equipment that compress the paper fibers may differ, in either case a depression is made on the outside of the greeting card, usually by a 2-3 pt. rounded die or other smooth, hard tool. Some machines pass the paper under a roller to create an debossed depression; others have an arm operated by a lever that pulls a bar down to create the depression. When the bar on the creasing device crushes the paper fibers, a small beaded impression results on the opposite side of the paper. The bead is the result of crushing the fibers in a perfectly straight line, allowing the paper to practically fold itself.

If you are printing your cards at a commercial printer, they know how paper behaves and they will take measures to insure that your cards are properly scored and folded. If you are printing or otherwise creating your own greeting cards, the scoring is up to you.

Do-it-yourselfers have traditionally relied on bone, plastic, or ivory tools to create the line of compressed fibers. When the scoring tool is dragged with pressure along a metal straight edge ruler, the paper fibers are depressed and crushed, creating a raised bead on the opposite side of the paper. This may or may not work well. I consider it a risky method, frequently less than perfect.

The growth in paper crafts, card-making and scrapbook arts has created a demand for improved scoring tools for artists and printers doing very short runs.

Score Boards

Crafters Companion, tested and recommended by the Creative Home Arts Club, is a handy tool for artists, card-makers, or anyone who wants to make clean, smooth folds, whether on handmade cards, envelopes or boxes. The Score Boards combine everything necessary to easily score paper and card stock.

Top Score Multiboard

Create the perfect crease and fold with the Top Score Multiboard, the quintessential tool for do-it-yourselfers crafting handmade note cards, greeting cards and boxes.  The double-sided card-making aide provides templates for scoring the crease in the exact position for A2, A7, and A8 (half letter) cards, as well as a number of other folds that can be created from papers cut to various sizes. The Multiboard doubles as an embossing tool, with a variety of lines and shapes from which to choose. The fully illustrated instructions demonstrate the following folds and card ideas:

  • basic half fold
  • gatefold
  • slimline
  • square
  • concertina
  • pop out card
  • creating a custom sized box
  • triangular boxes
  • diamond shaped boxes
  • window boxes
  • wedge, or cone shaped boxes

The Top Score MultiBoard includes a free embossing tool and complete instructions!

List Price $24.99

Your Price $19.95

The Enveloper

Create dynamic envelopes using virtually any paper in a variety of styles and sizes. Contrasting art papers make great liners for a stunning presentation of your hand made greeting cards. Includes a free embossing tool and complete instructions!

The Enveloper

List Price $24.99

Your Price $19.95

Crafter’s Companion Scoreboards Video DVD

This step-by-step instructional video walks you through a wide variety of techniques for creating professional folds on handmade greeting cards, boxes and envelopes. Use your computer or DVD player on your TV. Over 60 minutes of great ideas and a visual tutorials.

List Price $14.99

Your Price $9.99

Scoreboard Special – 1 Enveloper & 1 Top Score Multi-Board + 1 Free Instructional DVD

By ordering these two award winning tools together you will get the instructional DVD Free; an easy to follow step-by-step video that shows you how to use these tools.

List Price $59.97

Your Price $39.90

Images Show Through Clear Packaging

Frequently, we receive emails from artists who have questions about packaging their artwork, in this case, note cards.

I am packaging two each of four different images in an A2-1/2 clear plastic box. How can I present them so the customer can see all of the images they are buying?

We recommend artists print a reduced version of each of the images on a quarter sheet of paper. Add any other information that you want to show through the clear box, and insert the slip sheet in the back of the box (the side that the end tucks into, and face the cards and envelopes toward the front. That way when someone picks up the box and turns it over, they can see the four images, the artist’s name, bar code, or any other pertinent information you’d like to show through the box.

To get the most inserts from a single sheet of paper, place four A2 size inserts on a single 8.5″ x 11″. Of course, if your card size is an A6 (4.625″ x 6.25″) or an A7 (5″ x 7″), fewer images will fit on a single 8.5″ x 11″.

box insert sample

Envelopes for Note Cards and Greeting Cards

With a dozen different envelope styles and hundreds of sizes in existence, how do you choose the right one for your note cards and greeting cards?

For artists who are creating greeting cards we like to simplify the process by following standard envelope styles, sizes and general availability in the United States.

Style
Oak Creek Printworks includes announcement style envelopes with all custom printed greeting cards, and we sell announcement style envelopes in four sizes. Announcement envelopes have a square flap, while Baronial envelopes have a deep, pointed flap. Announcement envelopes are readily available in all the standard greeting card sizes. Baronial envelopes are manufactured in a variety of sizes, but available here by special order only.

Size
The smallest announcement style envelope is an A2. If your card folds to one-quarter of a letter sized page, it’s an A2. The matching A2 envelope is slightly larger than the 4.25”x5.5” folded card, and measures 4.375”x5.625”. Envelopes and packaging for A2 note cards are available in the Oak Creek Printworks store.

The A6 card is slightly larger, measuring 4.625”x6.375” when folded. Its matching envelope is 4.75”x6.5”.

The A7 card folds to 5”X7”, and the corresponding announcement envelope is 5.25”x7.25”.

The A8 card folds to 5.25”x7.875”. The companion envelope is 5.5”x8.125”.

The A9 card is an 8.5”x11” letter sheet folded in half to 5.5”x8.5”. The companion envelope is 8.75”x5.75”.

Square cards fold to 5.25” square. The companion envelope is 5.5”x5.5”.

Other envelope sizes, and colors other than white are available by special order.

Square Greeting Cards Are “In”

Wow! It seems like a real run on square cards lately. We’re seeing all sorts of interesting artwork coming from all over the globe that lends itself to printing on square cards.

You can print artwork on square cards that trim to 5.25”. Each custom printed square card ships with a 5.5” envelope. Clear, protective packaging is available in a variety of closure styles. Cards can be packaged individually in a snug-fitting clear plastic sleeve, or in sets in a larger sleeve, or a clear plastic greeting card box. Boxes ship with a gold seal, or you can dress up your gift card set with an elastic stretch loop, available for purchase in a variety of colors.

Before preparing your artwork for printing, decide if you want your card to have a white border, or if the image will bleed (print all the way to the trim). If you want the card to have a white border, make sure your artwork is square. If it is rectangular, the horizontal and vertical borders will be uneven.

Although your artwork and card are square, the card still has a horizontal or vertical orientation, and its orientation is what determines the placement of the artwork in relationship to the fold. A greeting card that has a fold at the top of the card has a horizontal orientation and opens in an upward direction. If your image has a vertical orientation, the card has its fold on the left.

Take into consideration that the specifications listed above reflect a standard set up for printing greeting cards in America. Other countries may have different standards and cards may read in different directions.

If you want your image to bleed, it must extend 1/8-inch beyond the trim on the three sides without the fold. The additional image area is necessary to insure that no white edge shows on your card. Make sure that your signature and important image data are far enough from the edges so that they won’t be trimmed away.

Reduced

This is a reduced view of the 5.25-inch square greeting card template. Click on the image to view and download a full size 72 dpi .jpg template that you can use to create the square greeting card.