Tag Archives: display

Important documents need protective packaging

Apple, Inc. sponsored ad for Educom '87If it’s Thursday, it must be throwback time.

While today, so much of our news is digital, electronic, and fleeting, all the more reason to protect your tangible items like photos, newspapers, cherished greeting cards and other important documents in clear protective bags. We don’t have any minimums on the quantity you order, and that can help you save money, especially on the larger size bags. No matter what size you need, you can order 3, 300 or 3000.

Order your bags today, and don’t forget to take advantage of a variety of ways to save on Oak Creek coupons.

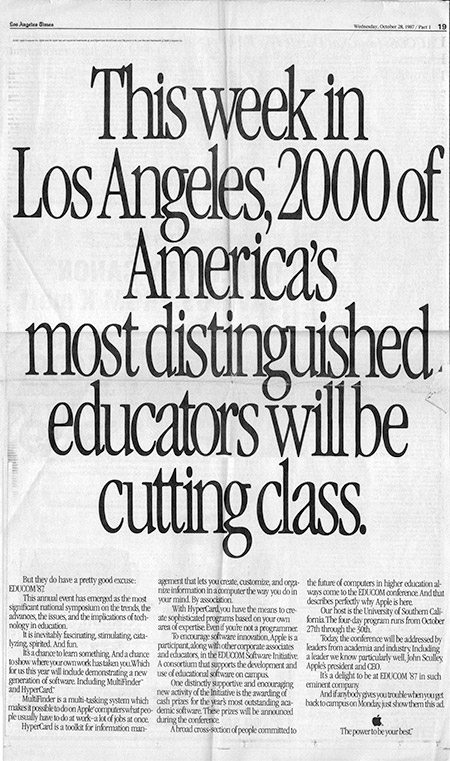
Spring is in the air, at least in some parts of the world and that means time to go through the flat files and drawers where we might find newspaper clippings, photos and other important documents. Performing this ritual, I found an accumulation of documents needing protection before decaying into yellow dust. Luckily, the older documents, like this Los Angeles Times article about Educom ’87, have long been comfortably nestled in clear plastic bags designed especially for protection, preservation and display.

The first time I worked as a consultant to Apple Computer, Inc. was in 1987 when I was one of a 3-person team hired to design and produce a daily print newspaper for the Educom ’87 international conference for higher education. For this purpose, the company Desktop Design was born, and John Grzywacz-Gray, Roger Karraker and I named our team Piece o’ Cake Productions.

Our 5-day mission was to demonstrate Apple’s cutting edge technology to university educators from around the globe by producing a daily “On-the-Spot” newspaper covering the conference. Each morning we delivered a new edition to the conference floor. To our knowledge no one had ever done this before. We were making “desktop” history. For the next three years, our Piece o’ Cake team consulted and worked with Apple, Inc. to introduce new technology to educators. Apple, Inc. sponsored ad for Educom '87 .

Following the Dream on Throwback Thursday

back-to-school

Very few people understood what we Mac Fanatics were up to in 1987 (let alone 1985), but I was following my dream of designing and printing from the desktop. The following month I made the business official and called myself Desktop Design. Today is little Joey’s 36th birthday. He currently works for Disney Studios as a Global Analyst. Happy Birthday, Joey!

Print bins display prints in a variety of sizes

clear acrylic

Clear acrylic print bin lets browsers focus on prints, not container. The smaller prints shown here are 8x10", doubled matted with foam core back, the medium prints are 11x14", and the large are 16x20".

This clear acrylic print bin is a handy solution for storing, carrying and displaying matted prints. Molded from a single sheet of eighth-inch acrylic with two handles, the 12-inch wide display stands 9.25 inches high on a counter top or table.

The angled arms of this elegant display make it easy for visitors to flip through a dozen or more images without disrupting the viewing area.

The print bin is a no-brainer solution for artists and photographers who want to make a variety of images available for viewing in limited space. When off duty, this multi-purpose container can moonlight in the bathroom or den as a magazine or newspaper rack.


Living My Life with New Eyes

Angela Sharkey was an Oak Creek Printworks featured artist in the winter of 2009/2010.

This colorful image of Roman pines was printed and used as a bookmark.

BY ANGELA SHARKEY
www.angelasharkey.com

I have been a professional artist for more than 20 years now and I have worked in both graphic design and the art industry and have found my true love in painting some 12 years ago. As an independent artist, I am constantly evolving with every changing landscape, pushing my boundaries whenever I can. My family and I move around the world quite often so I am constantly trying to find my place along the way in new and often unfamiliar cultures.

My home these days is sunny, ancient, noisy, and beautiful Rome, Italy. I visited this great city some 22 years ago as an artist living on a shoe string budget, and as many before me I was captivated by “la dolce vita.” Coming back to Italy to live has been a dream for me and I am determined to live life to the fullest. The French novelist Marcel Proust sums up my attitude in life quite well in his beautiful and poignant quote:

The real voyage of discovery consists not in seeking new landscapes but in having new eyes.”

With all the difficulties of moving so often and adjusting to a new life I find it fascinating how altering my vision or having new eyes can affect what I see and how I feel. This way of seeing, in turn, ultimately affects those around me—hopefully in a positive way. As I look around I see so many lives moving in different directions; everyone’s eyes are capturing a different view, giving us all our own unique perception.

Roman-pine-over-bridgeAs an artist I like to approach my work when my vision is overloaded with colors and scenes and I need to translate everything onto the canvas. I am always looking deeper, certain there is more below the surface, hoping for more clarity. In my work as an artist and in everyday life I am very drawn to color, and my art is a great way for me to express this.

Whether I am in the Tuscan countryside counting the endless cypress trees that line the country roads, or studying the rolling hills dotted with Roman pines, I envision the colors I want to capture as I sketch and study nature. Gazing upon the magnificent architecture all around me I break the images down into simple forms and shapes putting color where it once was and bringing texture into the piece. Everywhere I look I am inspired by the beautiful Italian landscapes and architecture, which I then transpose to the canvas through my own vision.

Tuscany-landscape-2011Alongside my work as an artist I am currently working as an art curator for the Mel Sembler Gallery at the US Embassy in Rome. My job allows me to show my art once a year at the gallery while the remainder of the year I scout American or international artists, along with the curating team, for those interested in showing at the gallery. Every month we show a new artist’s work which includes sculpture, painting, photography, textile art, and mixed media. I have had the privilege to meet many talented individuals and enjoy sharing in their excitement as a distinguished artist showing at the US Embassy Mel Sembler Gallery. For some artists it is their first solo show and I am honored to help them show their work in the best light possible, giving them the exposure they deserve.

In the month of March we have a special show dedicated to children’s art. The children of embassy employees submit their work which is then displayed in the gallery much to the pride of the young artists and the admiration of the adults. It allows the children a sense of confidence and accomplishment that they are able to publicly display their works. I have always enjoyed children’s art as it is uninhibited and free. This March 2012 we will be happy to help celebrate the 100th anniversary of The Girl Scouts of America as the Scouts submit their artwork to our gallery for the children’s art show.

I have seen firsthand the Mel Sembler gallery is more than just a venue for showing art, but a real-world setting for joining Americans and the international community. Through our art we are bringing people together to share ideas and connect our lives and families. I believe we all have the possibility to see with new eyes, regardless of the landscapes we are navigating, and bring forth positive new visions for our world.

roman-pines-bookmarkAngela Sharkey
Roma 2011

Easy photo mounting

By David Heyman

One problem that can arise when displaying photographs is the appearance of wrinkles and bubbles in the print over time. This is caused by changes in temperature and humidity affecting the paper, as well as the effects of gravity pulling on different areas of the image to different degrees, causing warping and wrinkles. This can happen whether your photographs are in mats, gallery presentation packages or have been framed.

For a smooth, flawless surface, photographic prints need to be mounted to a sturdy board. While dry mounting produces excellent results, it is expensive and requires large, heavy equipment, or time consuming trips to the custom frame store. An easier method, that you can do yourself at home, is to mount the prints on a self adhesive mounting board, such as Crescent Perfect Mount.

Simply place the board on a flat, clean surface, peel off the liner paper, then place your print squarely on the mounting board. If the print is large you need to start from one side, and work your way down the print, making sure there are no air bubbles trapped underneath the paper. Cover the mounted print with the liner paper, and apply firm pressure, from the center towards the sides, to release any trapped air.

Put a weight on top of the package for 24 hours, and then your print is ready for display.

The Benefits of Archival Mats

by David Heyman

The function of a mat is to give breathing space around your artwork or photograph, letting the eye have a place to “rest” while taking in the image. A blank, neutral mat border surrounding the work adds class and transforms what could be a snapshot into a real work of art. Notice the transformation of this image from a plain poster frame, into a professional, gallery quality display, just by the addition of a mat.

The image on the left looks like a decorative poster, while a mat instantly transforms it into a work of art.

The image on the left looks like a decorative poster, while a mat instantly transforms it into a work of art.

Mats come in many shapes, sizes, colors and textures. However, one crucial element  is often overlooked when selecting a mat: whether or not it is archival in quality.

The majority of mats on the market today are made from wood pulp, the same substance used to make mass-produced paper. While paper products made from wood pulp are inexpensive and abundant, their use in displaying and protecting artwork is limited, due to their rapid decay and discoloration.

Wood fiber contains lignin, an acidic substance that is a cellular component of trees. When that fiber is made into paper, including mats, the lignin remains in the finished product, making it a ticking time bomb for eventual disintergration.

Acid causes mats to yellow, staining your artwork in the process. Gone unchecked, a paper mat will eventually turn brown and become brittle, spreading acid burn on to your work. While substances can be added to the paper fibers to slow down the deterioration, they are temporary, and no mat made with wood pulp is suitable for archival use.  Look at the effects of a wood pulp mat on this photograph:

Notice the yellowing and discoloration on the image matted with an acidic wood pulp mat.

Notice the yellowing and discoloration on the image matted with an acidic wood pulp mat.

The finest mats are made with cotton, a fiber that is naturally free from lignin. 100% cotton mats will never yellow, turn brittle or damage your valuable work. Although initially more expensive than the imported mats made with wood pulp, Oak Creek Printworks Bainbridge Alphamats are a good investment, ensuring that your art is protected and will never be ruined by the careless addition of an acidic mat.

When choosing a mat for your work, never settle for “acid-free”. This is a term thrown about so often it has become almost meaningless. Anything can be labeled acid-free, but that doesn’t mean it will last. An acidic wood pulp mat that is sprayed with an akaline coating is called “acid-free”. Yet the acid in the mat will quickly overcome the coating, and it will have worn off even before the mat is used for diplay.

Here are some criteria to use when selecting a fine quality archival mat:

  • Is it made from wood pulp, “high alpha cellulose”, or 100% cotton?      Nothing is as stable and naturally archival as cotton.
  • Is the mat just “acid-free” or is it truly archival?    An archival mat never needs to be processed or coated to have acid removed, as there is no acid to begin with.
  • Are your mats imported from China, or made in the USA?   Don’t be fooled by offers of “acid-free” imported mats that are too good to be true. Our archival mats, in a bright white, cream, black and gray, are made in the US, and cut right here at our studio.

One quick way to check if the mats you have are truly archival  –  look at the bevel (the slanted cut right next to the window of the mat). Wood pulp mats start out with a yellowish core, which quickly turns brown, as shown in these photos. A cotton mat starts out with a bright white core.

On a wood pulp mat, the bevels start out yellow, then quickly turn brown.

On a wood pulp mat, the bevels start out yellow, then quickly turn brown.

Your artwork is your passion. Never compromise or hurt your images with an acidic mat.

Art Fair Necessities: Learn from the Pros

by Georgia Lange

Last month I paid homage to the prestigious Beverly Hills art show known as the “Affaire in the Gardens”. This art show features over 200 nationwide artists and attracts up to 40,000 spectators every fall and spring since 1973. If you are a fan of outdoor group art shows and fairs, Affaire in the Gardens is top of the line. Even the Andy Gumps are swank at this renowned event.

The Affaire in the Gardens art show is almost too prestigious to be labeled an “art fair”; these individuals are not selling candles and clothing. In researching the exhibition guidelines, I learned that all wearable art and accessories (with the exception of jewelry) is strictly prohibited. Although this particular art show may be out of the traditional art fair league, no one can say that its magnificent display methods cannot be used as a model to other artists for other art shows.

How do these artists prepare for a show such as the Affaire in the Gardens art show; how were the booths set up? How was the necessary equipment acquired? What did each artist offer to promote his or her work? This article is specifically geared towards artists who may want to participate in the Affaire in the Gardens art shows in the future, and how one can prepare for application and participation. However, many of the principles discussed here could be applied to outdoor art shows other than the Beverly Hills art show. It is important to remember that every art show has different guidelines, and it is vital to do the research and examine the requirements before beginning the preparation process. Pay strict attention to deadlines and be at least partially prepared before applying, and remember that what applies to one show may not apply to another.

Click here to see full pdf article

10 Easy tips on displaying your greeting cards

OK, you’ve decided that one way to sell your artwork is on greeting cards. You’ve found some places to sell them – craft fairs, farmer’s markets, local merchants. However, displaying them in booths or on the countertop is different than displaying larger artwork. The most common ways to display cards are in spinner racks, on slat walls, on acrylic shelves, and in free-standing displays. Any display that shows the full faces of cards is ideal. Beyond that, greeting cards aren’t exactly a three-dimensional product, sometimes making them difficult to display creatively.

Here are some easy tips on how to display your cards for sale.

1. No room for a table top display at your farmer’s market booth? Show them off on string or colorful ribbon strung between the posts of your booth or hanging vertically. You can even find mini-clothespins at a craft store to attach them. Keep cards for purchase stored in a box under the table.

2. Make shoe boxes (perhaps wrapped in wrapping paper) with dividers for clients to sort through. Just Something I Made is a wonderful blog on how to build a tiered box system for displaying your cards.

JustSomething

3. Sell sets in clear boxes. Prepare a sheet for the bottom of the box that shows all the card designs included in the box, as shown below:

ClearBox ClearBoxInsert

4. Buy acrylic cardholders for counter-top display. These can be very inexpensive, and are perfect for displaying just one or two card styles on a countertop. Oak Creek Printworks carries small and large stands.

AcrylicEaselSm BackEasel BCEasel

5. Use office divider racks to display your cards. Some office supply stores have what they call “junior” racks, which are smaller than the 8.5 x 11 file size racks (too big for greeting cards).
WireRack

6. Laminate your cards together on a large sheet of paper. If the cards are blank inside you can just show the fronts. If there are verses inside you will want to show both the front of the card and the inside.  These laminated “posters” can be displayed on a table or by hanging on a wall.  Depending on the size, they can also be displayed in an album or flip chart. The art always stays clean, and you can even use dry-erase markers to write on the poster, and wipe it off later. Perfect for listing prices or emphasizing sale items. The actual cards for purchase can be stored in a box or file under the table.

7. Display your art online using a website or a blog, such as Facebook or WordPress.

Facebook – Display your designs and cards on your own facebook page. Link to your blog on WordPress. Join groups of artists who will link to your page and blog, like the Graphic Artists page.

WordPress provides public domain blogging software, which means it is FREE! It is easy to set up an account. Here are some examples of sites that are selling cards with WordPress sites:

Rikki O’Neil and Friendship cards

8. Use a scrapbook or portfolio book to display the cards on a counter top, and store actual cards for purchase in a box or file underneath the counter. The scrapbook can be purchased or even homemade.
scrapbook
9. Arrange a 3-D display on heavy posterboard using the adhesive 3-D dots that scrapbookers use for their album pages. The downside to this method is that if the display board or cards get dirty or dogeared they can be hard to clean.

PopPoster-Cards dotPoster

10. Acrylic Spinners – a perfect countertop or floor display.

Blog-spinners

Don’t forget, when displaying your cards, the best way to protect the artwork as potential customers handle them is to use some type of protective sleeve. Check out our card jackets, no-flap bags, and protective closure bags.

We hope that this information has helped you, and would love to hear how you display your products. Leave a comment, or send us an email at info@oakcreekprintworks.com. Include a photo and we will try to post it here on the blog.

Greeting cards at the Post Office? How can you cash in?

That’s right – at the post office! The financially troubled U.S. Postal Service has a “get well” plan that includes selling Hallmark greeting cards at their local branches. Check out the Washington Post article for full details.

PostOffice

Marketing Your Artwork

So how can greeting card artists cash in on this plan? While you can’t compete with Hallmark at the USPS, check out your local mail franchises, such as Postal Annex, Mail ‘n More, PostNet, etc. Our community also has several postal sub-stations (franchises) at various locations, such as the Sears Catalog Store. Franchise owners are often willing to display greeting cards. You can check on the franchises in your community on franchisegator, franchise-guide, or at postalconnections.

How you display your artwork and cards is very important. While you might not be ready for a large spin-rack, the cost-conscious artist can start out by using our individual acrylic stands. They come in multiple sizes, and are reasonably priced.  Check out our clear acrylic small card/print stand, our large card/print stand, and our print/calendar holder. Each stand will hold multiple cards and envelopes.