Tag Archives: artwork

Flair Magazine Annual is Back in Print

Flair Magazine 1953 Annual

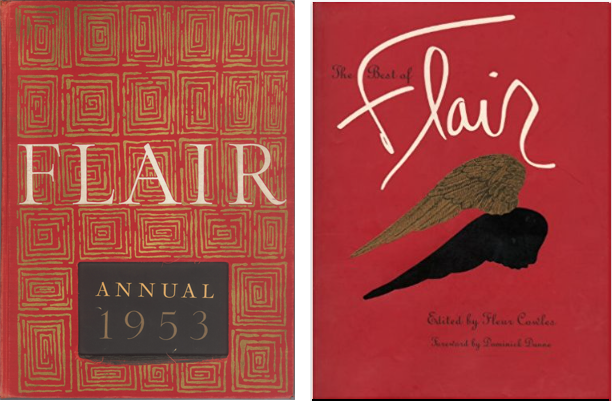
Left is the original 1953 Annual, and right is a reprinted compilation of the critically acclaimed magazine.

While out and about last weekend I happened to wander into a Barnes & Noble bookstore.

As usual, I found myself in the Graphic Design section, and my attention was immediately drawn to a large red volume on the top shelf.

Pre-ecommerce, I had searched unsuccessfully for another copy, wondering if the magazine had been published for more than just one year. The volume in B&N was confined in a clothbound box and shrink-wrapped, so there was no opportunity to browse its pages.

Knowing Flair was again available, I checked it out on Amazon. Still, no opportunity to flip through the pages but with plenty of copies available, I snatched up a cheap one just so I could cut out the uniquely designed and printed pages.

Flair was quite innovative and was said to be “the first magazine that became an art form,” featuring the work of Salvador Dali, Matisse, George Bernard Shaw and Walker Evans to name just a few.

According to the Amazon description of the new publication, “this facsimile edition offers the same ingenious bookmaking of its predecessor, including multiple gatefolds with die-cuts, booklets, and accordion folder leaflets.”

If you’re a fan of uniquely printed art, you might pick up a copy of the Flair Annual 1953 while it’s still available.

Drawn to Color

beach front property

Just what was it about this old, weather-beaten shack that kept pulling me back to it, as if by some mysterious, invisible force?

It is one of my favorite photographs from a recent trip to the Caribbean. Okay, I know that seems a little weird, at least I thought so, because in the Caribbean there is a beautiful landscape-seascape at every turn, and so much Color.

In addition my work here at Oak Creek Printworks, I teach Publishing and Prepress as well as the Adobe Create Suite at Moorpark College, a local community college. This prompted me to sign up for the Adobe Creative Cloud. For a flat monthly fee, I now have a “virtual desktop” on the Adobe Creative Cloud Server. There I have access to, not only all of the latest versions of the programs in the Adobe Creative Suite, but easy access to a myriad of tools and videos that help with all things Adobe.

Adobe Creative Cloud Dock

One of the tools on my Creative Cloud desktop is a section labeled “Colors,” where Kuler (pronounced “cooler”) performs an “extraction” on the uploaded image. The extraction draws colors from the image and displays a color palette like the one in the illustration above. The new swatches can then be downloaded and used in the Creative Suite programs. I loaded the Adobe Swatch Exchange (ASE) file into Photoshop and used the new color swatches (the last 4 in the palette) to quickly work color into the “Beachfront Property” headline and background. I selected a typeface the felt like it belonged to the old shack…and that’s when it dawned on me.

Not only was this the identical color palette I had recently chosen when redecorating my kitchen, but it is a color palette that has been recurring in many important ways since my earliest memories, beginning with summer beach vacations, and the colors of my favorite room in my early childhood home. I relate to these colors in a profound way. You might say I’m drawn to them.

So I think these particular colors have just a little to do with my emotional attachment to this out-of-focus, tightly cropped image, which I intend to make into, well, something. Beyond that tiny bit of subjectivity, I will not critique this photograph any further. I’ll leave that to anyone who has read this far!

Try a #10 Greeting Card for Panorama Images

Angela Sharkey

Wondering what to do with your auto-stitched and panorama photos? Bookmarks aren’t the only game in town. Long rectangles, either vertical or horizontal, transform into attractive greeting cards when presented on a #10 business sized greeting card. That’s what Angela Sharkey, former Featured Artist, did recently with some of her latest paintings. Rather than try to make the oblong shapes work on an A7, A6, or A2, more traditional greeting card shapes, Sharkey opted for the less commonly used #10 size.

 Photoshop

To set up your card in a Photoshop or other raster-oriented software, create a new document that is 10 inches wide by 8.75 inches in height. A document this size will accommodate the trim marks needed to accurately cut the card to size. If you want your image to bleed; that is, print all the way to the trimmed edge, it is important to extend your image beyond the trim marks by .125-inch. The bleed setting is represented here by the red line. The actual card trims to 9.25-inches wide by 8-inches in height. The trim is represented by the black line. A #10 card folds at the halfway, or 4-inch mark, represented here by the cyan (blue) line. All of these lines (including the black trim marks that fall at the four corners of the black trim line) are non-printing and part of the template. Simply redraw onto a printing layer the eight trim marks shown at the four corners.

 InDesign or Illustrator

If you use Adobe’s InDesign or Illustrator, set up a new document that is 9.25 inches wides and 8 inches in height. If your image will bleed, in the document setup options, create a bleed of .125 inch. Once the page is set up, drag a guide from the ruler to the 4-inch mark on the vertical ruler to indicate where the card will fold. To print, export your file to a print resolution .pdf with crop marks and you’re ready to rock ‘n’ roll.

Angela Sharkey is the curator of the Mel Sembler Gallery in the U.S. Embassy, Rome, Italy. View more of Angela’s art here.

Print bins display prints in a variety of sizes

clear acrylic

Clear acrylic print bin lets browsers focus on prints, not container. The smaller prints shown here are 8x10", doubled matted with foam core back, the medium prints are 11x14", and the large are 16x20".

This clear acrylic print bin is a handy solution for storing, carrying and displaying matted prints. Molded from a single sheet of eighth-inch acrylic with two handles, the 12-inch wide display stands 9.25 inches high on a counter top or table.

The angled arms of this elegant display make it easy for visitors to flip through a dozen or more images without disrupting the viewing area.

The print bin is a no-brainer solution for artists and photographers who want to make a variety of images available for viewing in limited space. When off duty, this multi-purpose container can moonlight in the bathroom or den as a magazine or newspaper rack.


Pantone Guide to Communicating with Color

Three spreads from Communicating with ColorJust a few years ago, Leatrice Eiseman’s classic Pantone Guide to Communicating with Color, published in 2000, was out of print. In 2006 Eiseman came out with a second book continuing her color explorations, Color: Messages and Meanings. By that time, used copies of the first color book were going for nearly $200, way too steep for all but the collector.

I recently saw Eiseman’s 2000 book pop up again on Print and How magazines’ mydesignshop.com website in their “Deal of the Century” category. While it’s a bit too soon to make a hundred-year claim, I have to admit, Print and How magazines are offering those interested in the study of color a truly smoking deal.

Treat yourself and your designer buddies to a priceless holiday gift that you can be sure will be a handy resource for years to come. I’m delighted that I’m able to replace my tattered copy held together by rubber bands with a brand spanking new book for just $4.99. That’s really has got to be the “deal of the century!”

Featured Artist Pays for Mission Trip by Making and Selling Greeting Cards

Graydon McKoy holds "t-rex"Graydon McKoy is a nine-year-old boy finishing third grade, and is in his first year of home schooling. He lives with his parents on Wadmalaw Island in South Carolina, a very rural ­island with a farm rich history located in ­Charleston County. Graydon’s father, one of the few farmers left on the island, grew up ­farming with his father. Graydon’s mother has an advanced degree in biology but is now using her knowledge to home school the ­budding artist. With the background both of his parents have to offer, it is no surprise that Graydon loves the outdoors and every creature that inhabits it.

Since he was very little Graydon has loved books about nature and enjoyed taking walks to observe God’s creatures, no matter where, or how slimy they were.

In addition to searching for wildlife, ­Graydon cares for three horses, one German ­Shepherd and a cat, but what he really wants is a snake. His mother has not yet consented to that request, but they have spent the last three summers documenting the snakes they find on their farm. To date they have spotted over 13 species of snakes and look forward to ­participating in the annual springtime snake round-up that the local serpentarium conducts.

seahorse

Graydon’s art began at the young age of four, and highlighted the favorites of all little boys: sharks, alligators, dinosaurs and snakes. Thanks to a great art teacher from first grade, his talent was cultivated and his horizons expanded with the love for animals remaining as the main theme in all of his work.

In a span of just three years, ­Graydon has developed quite a portfolio, which his mother has saved, and scanned onto computer discs. His talent was put to use this year when Graydon’s family decided to go on a mission trip with their church to Costa Rica. They did not have all of the ­funding needed to pay their way, so his mother had an idea to use Graydon’s art work as a fund raiser.

She took some of his pieces that had been scanned and then put them on her computer and converted them into note cards. The cards sold really well, and not only raised enough money to pay for all of them to go to Costa Rica, but, also raised enough to pay for a home school trip afterwards.

As a result of this success, ­Graydon now has his very own business and calls it “Graydon’s Critters”. He is working on two new series; one focusing on Charleston and one highlighting the fish served at a local seafood restaurant. He ­continues to practice with mediums such as chalk, watercolors and oil pastels, but is expanding to acrylics and looks forward to learning how to mat his own work.

To see Graydon’s portfolio, visit his website – www.graydonscritters.com. You’ll also find Graydon’s Critters on Facebook.

marsh flounder

Spring Art Fairs

by Nancy Haberman

It’s officially springtime, the start of a season of art fairs, craft shows and holiday boutiques…in other words, a prime time for artists to earn extra money selling matted prints, greeting cards, bookmarks and other printed products.

If you can reproduce your artwork, whether it’s photography, painting or another artistic medium, then you can create a marketable product at an affordable price.

Make an attractive presentation with a ready-to-frame, professionally cut, 4-ply acid-free, archival mat, back and bag combo. The mat protects the print from contact with the glass and serves to focus the viewer’s attention on the artwork, and away from the frame. The foam core backing is extremely lightweight, yet sturdy enough to provide protection for artwork. The crystal clear bag with peel ’n’ strip adhesive closure protects artwork from dust and fingerprints.

A big part of an art show is the experience of browsing through a variety of art from multiple artists. Artists have used everything from plate racks to orange crates to present their prints. To create a professional appearance and easy accessibility to your artwork, consider easy to transport canvas or acrylic print displays and greeting card spinners.

How do I measure my artwork for matting?

By David Heyman

A mat makes any image look more professional. Even without a frame, simply matting your photographs or artwork will do wonders for the presentation, and sales potential, of the work.

Although mats come in many standard sizes, if you are working with custom size images, or anything that is done on a paper that is a creative size, your mat will need to be custom cut. Oak Creek Printworks offers custom cut mats, at a cost relative to a standard size mat, with no extra charges.

How to give the correct measurements for a custom mat is one thing that many artists find confusing. Since custom cut mats are cut to order, it is important to have your borders and window measurements accurate. While you can always call David, our custom picture framer, at (805) 390-4955, with any questions on sizing of borders and windows, the following is a guide that will give you reliable results:

  • Measure the outside edges of your image. Do not assume your image is a certain size. You may have ordered an 8″ x 10″ photograph, but the image actually measures 7-7/8″ x 9-7/8″. If you are matting artwork on paper with an uneven edge, such as a deckle edge, measure the narrowest part of the horizontal and vertical sides, as shown in this photo.

* Add photo of deckle edge watercolor paper, showing w/ ruler how to measure*

  • Decide if you want even borders for your mat, or a weighted edge. Some people feel that having the bottom border of the mat slightly wider makes the image seem more centered when viewed from a distance. This is called an “optically centered” window.

CenOPCenMats2

  • How wide do you want your mat? A narrow mat allows the image to stand out more and can fit a tight frame. A wide border gives the work dramatic presence and can transform a small image into a large piece. Whichever you decide is up to you, it is just a matter of personal taste. Here are examples of both styles:

NarrowWideMats

  • When you have this information, perform these two simple calculations, and you are ready to go: To get the outside dimension of the mat, add the horizontal dimension, the width of the mat and the width of the mat again. For example, if your image is 8″ x 10″, and you want a 4″ wide border, add 8 + 4 + 4 = 16″. Do the same with your vertical dimension, in this example – 10″ + 4 + 4 = 18″. So your outer mat dimension is 16″ x 18″.

OuterMat

  • The second calculation is your window size. That is simply your image size, minus a slight amount for overlap. Since the window will cover the edges of the image, it needs to be slightly smaller than the artwork. We recommend a 1/4″ overlap, which will allow enough room for overlap and attachment to the back of the mat. In our example, with an 8″ x 10″ image, your window size would then be 7-3/4″ x 9-3/4″.

Print

With practice, this process becomes second nature, and can be quickly transformed into a host of eye-catching sizes for all of your pieces. Taking a little time to measure your own custom mats can save you much time when preparing your shows and matted prints. Which will then give you more time to do what you do best – creating!

THE ETIQUETTE OF LETTER WRITING

by Georgia Lange

etiquette of letter writing

Original artwork and design by Wendy Patterson of Cafe Baudelaire

etiquette |etikit; -ket| – noun
the customary code of polite behavior in society or among members of a particular profession or group


Several months ago, I was listening to NPR and tuned into a discussion about handwriting. It was under debate whether handwriting is a dying practice in the digital age of communication. People rarely write hand-written letters anymore; the vast majority simply send an email or a digital greeting card. As I listened to the discussion, my inner fine artist started to cringe; I remember hearing similar discussions at the School of the Art Institute of Chicago (SAIC) over the future of painting, museums, hand-drawn animation and so forth. Traditions live on because we as a society choose to honor them by continuing their practice. There is something special about the tradition of creating things with our hands, and it is important not to lose the little things (such as handwriting or hand-written letters) just because modern technology makes it so much easier for us. Whatever your craft, your hands are as unique as your fingerprints. What you create using them is just as unique as you are, and just as precious.

Sending a hand-written letter has a much more personal and classy touch than an email. There are many ways to turn your hand-written letters into something extra special. Try writing with a quill pen or sealing your letters with a wax seal. This adds an artistic element to your letters giving them a more vintage and romantic quality. Check out nostalgicimpressions.com for an excellent selection of sealing wax, seals, and quilled pens. If this kind of etiquette appeals to you, than you are truly an artist at heart. Creating your own greeting cards with your art on them is the best way to turn your letters into gifts.

Giving someone a piece of your artwork, be it a print or an original, is a truly special kind of gift because it comes directly from you, and it makes the recipient feel just that much more special. The same principle also applies to greeting and gift cards. Maybe there are people in your life that you feel you do not have a close enough relationship with to warrant giving them a gift, but you still feel the need to let them know you are thinking of them. You may also have friends who are spread out across the country to whom you cannot afford to ship presents, but you still want to wish them a happy holiday season. Sending a greeting card with your original artwork printed on it is similar to sending a fine art print on a smaller scale. If you have your greeting cards printed in a 4 x 6 or 5 x 7 inch size, the recipients can easily place it in a frame turning a simple card into a work of art that can hang on their walls. It is also cost effective and allows you as an artist to market your work and your talent. Save that box of holiday greeting cards that you bought on post-holiday sale at Barnes and Noble or Borders last year and make your greeting cards more intimate and personal with a touch of the artistic and a touch of you.